Tuesday, August 23, 2011

"What Lies Beneath" Feelings Mask Activity


When looking for activities to teach children about their feelings, how to identify and express them, I have struggled to find something that is not only meaningful but fun as well!  Here is an exercise I have pieced together from experience and imagination that may be helpful. The children who participated in the sample were in fifth grade, though I'd guess that those as young as second or third grade, depending on the ability to understand or at least identify more complex emotions (and the mess factor involved in the activity itself), might be appropriate as well. Older children, teens and adults would likely enjoy this exercise - I'd like to see an adolescent or adult anger management group try this one. 

The premise for this activity is that when we appear angry or say we are angry, most often there are many different feelings behind that anger; loneliness, jealousy, frustration, and sadness, for example. The mask is a metaphor for this. The outside of the mask represents what we show to others, the inside shows what may be underlying what is shown to others, what is "behind the mask".   To prepare for this activity, I had students draw a picture of what their anger looks like (the outside of the mask) and had students list at least 5 feelings that they have that might underlie their anger (use more or less depending on the target group) on the reverse side of the paper. This makes things go more quickly once the painting begins as well.

**Plan on completing this activity over several days or sessions to allow for dry time for the paper mache and paint. Give about an hour for the first and last sessions and ten to fifteen minutes for each session in between (when applying layers).**

Materials Needed:
  • Plastic Masks - Full Face - One for each participant. These are available at any craft store. You could forgo the paper mache and just use the plastic masks, but that wouldn't be as much fun!
  • Plastic Wrap - to protect the plastic masks so you can use them again
  • Newspaper - Ripped into thin strips plus some to use to protect the surface you're working on
  • Copier Paper - Ripped into thin strips
  • Flour
  • Water
  • Ice Cream Bucket (or other large container)
  • Acrylic or Poster Paints
  • Paint Pens (optional but they are super handy when writing the words inside the mask and for detailing on the outside of the mask

Day/Session 1

Protect your work surface (plastic garbage bags work well, though newspapers will do fine) and prepare the mask by wrapping plastic wrap around and securing it in the back

Prepare the paper mache mix. (I used the "Raw Flour and Water Paste" recipe from the Ultimate Paper Mache website).  Basically, you put some flour in the bucket and then add a little water at a time and mix until you get the consistency that you'd like. The site says that the consistency is up to you. We made ours similar to the consistency of pancake batter (maybe a little runnier). I found that using a whisk helped to keep the lumps down and seemed to make it blend quicker than when I tried mixing it with a spoon.

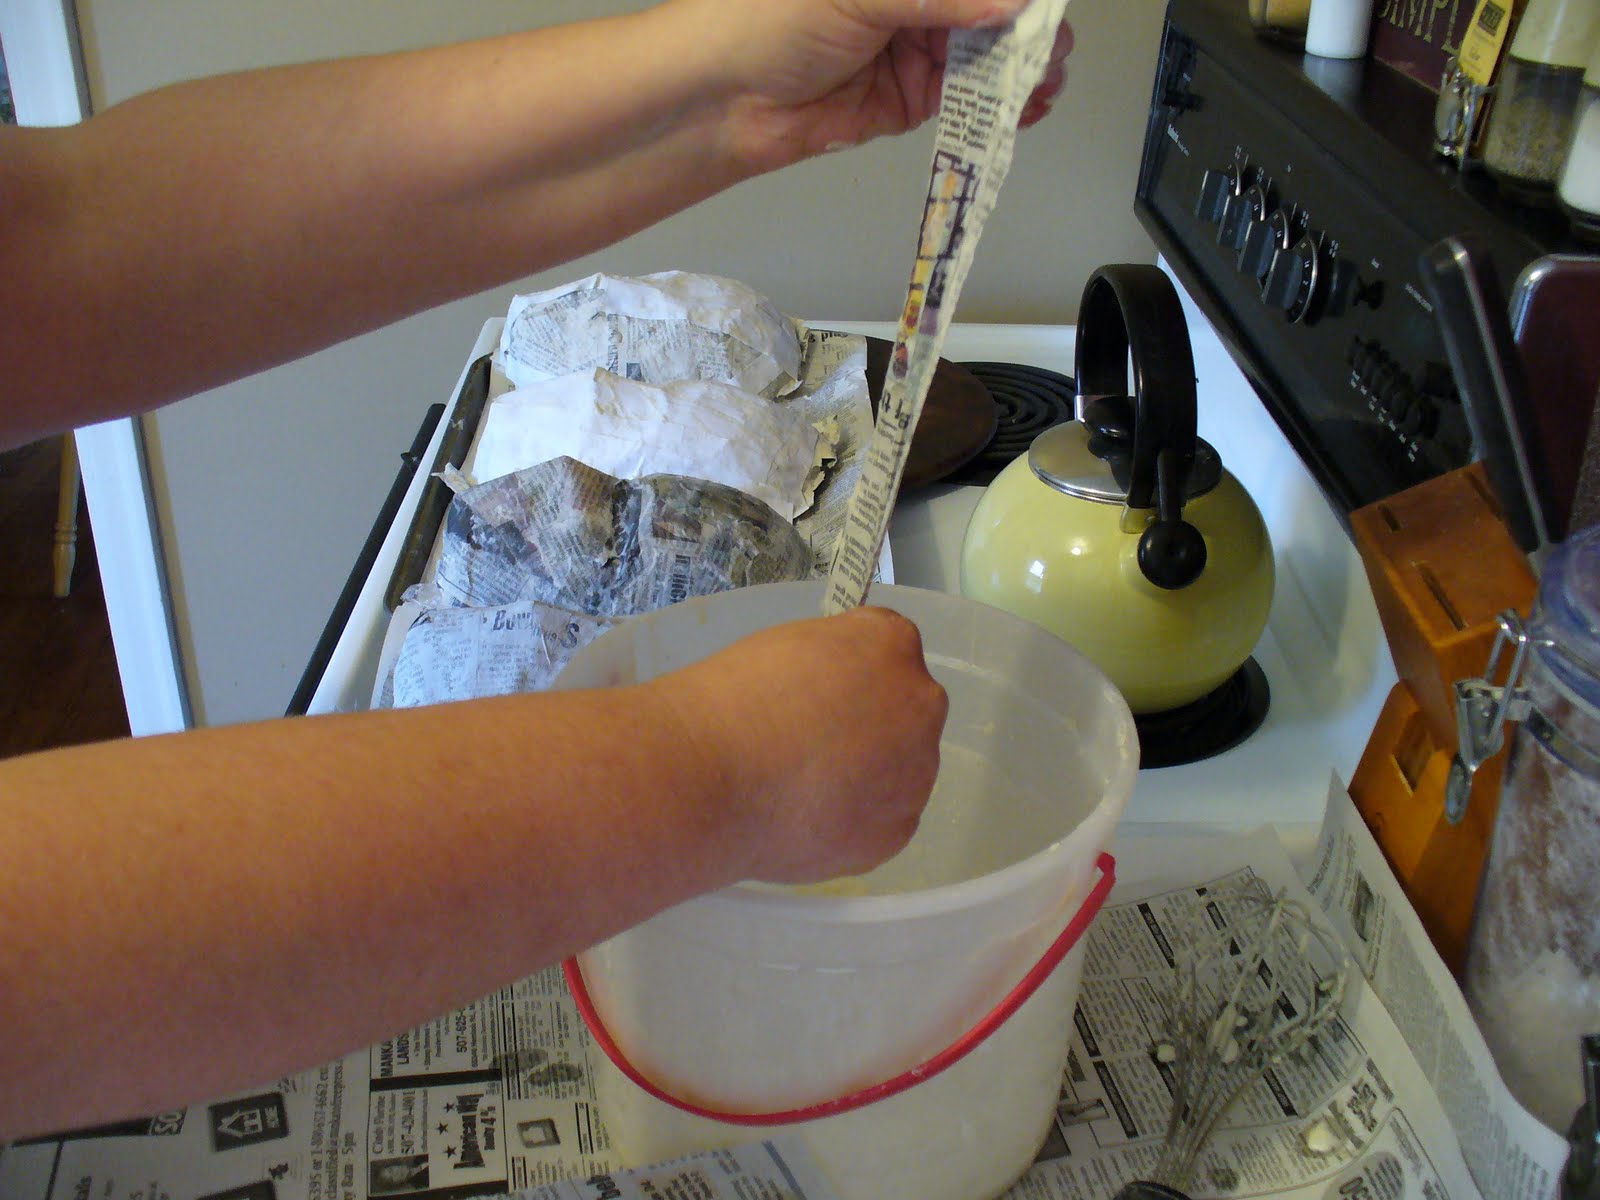
If you haven't already done so, rip newspaper into strips about 1.5" wide or less (the photograph shows some strips wider than that but the masks took longer to dry).

Dip part of the strip into the paper mache "batter" and use your fingers to pull the paste down the length of the strip (getting rid of extra paste). I found that dipping part of the strip worked better as dipping the entire strip ended up leaving a lot of paste on the paper and that isn't wanted (the less paste, the less time it takes to dry).

Beginning at the top of the mask form, add the pasted paper strips in a horizontal pattern, overlapping slightly the strip next to it. Make sure that you've got the entire form covered. A tip - when you are finished applying the layers, take a piece of newspaper and gently wipe the excess paste off the mask, this also helps the mask to dry faster and makes the mask less bumpy to paint.

Let that layer dry. You have a few options here. You could let the mask dry overnight. You could point a fan at it, rotating it every 20 minutes or so, until dry. Or, you could dry the masks in the oven using the very lowest setting. Make sure not to forget about them! It's very important that each layer of paper mache is dried thoroughly before adding the next layer otherwise the masks will rot and they would be spoiled.
If you're going to be working on the masks again that day, you can put the paste in the refrigerator in between. Take it out and give it a chance to warm to room temperature before using again. I found, while experimenting with this activity, that the flour paste goes bad in a few hours (stinky!) so I'd do the refrigerator thing or mix new batter when you start working on the masks again. 

Day Two/Session Two

Mix a new batch of paper mache paste (or remove the paste you have made from the refrigerator). Using the same dipping technique as the last session (dip the strip in the paste and pull down with your fingers on either side of the strip), apply newspaper strips vertically over the dried strips.  Allow to dry.


Day Three/Session Three

Repeat the application, this time horizontally again. Allow to dry.

Day Four/Session Four

Apply
strips of pasted copier paper vertically over the last layer. This is the base on which the participants will paint their faces.

Day Five/Session Five

Have each participant paint the outside of  their mask to show what they look like when they are angry. When that dries, have them paint the inside of the mask a solid color. You could skip this step and just have them write/paint their feelings words directly on the newspaper but I think people will be more pleased with how things turn out if the inside is painted first.


Final Session

Have each participant write feelings that might underlie their anger on the inside of the mask using paint or a paint pen.  Share and discuss. You may ask the participant to tell why they painted the outside of their mask the way they did (in the photos shown here, one student painted their mask with tears because they felt that best described what they looked like when they were angry, another painted steam coming out of his nostrils), what feelings words were underlying the anger, to give specific examples of when they feel those feelings, etc.


You can vary the activity based on the age or ability level of the group, the topic or emotion of focus. Instead of focusing on feelings underlying anger, the inside of the mask could give situations contributing to feelings of anger. This could be an activity for a grief group with the front of the mask showing how they feel when they think of the person they lost and the inside of the mask showing what they'll miss about them or special memories.  The possibilities are virtually endless.

Feel free to add your suggestions below! 


Sunday, August 21, 2011

New Website Up and Going!

I've just updated my website! That took a little bit but, I have to admit, it was kind of fun!

Check me out:

www.artsiedesigns.com

Oh, and did I mention that I have a new site on Etsy?  Check out my new supplies site. It's super fun and people really seem to like it!

www.artsiesupplies.etsy.com

Thursday, August 4, 2011

Somebody Like Me, Please! Anybody? Anyone? Hmmm...

So I didn't realize that you had to have a dedicated name on Facebook.  I've been referring people to my page and they haven't been able to see it! I finally figured it out, so go ahead and "like" me.  I'm really fun! Really! ;-)

Become a Fan!

Monday, July 4, 2011

New Items!

My goal today is to list all of the beads that I haven't listed. I've had dozens with photographs but never had the time or energy to list. I've got 10 done so far. Yipee! You can check my progress here:

http://www.artsiebeads.etsy.com/

Saturday, May 21, 2011

New Logo?

I'm trying to figure out a new logo ... What do you think of this one?  Comments, please!

Wednesday, May 18, 2011

Bummer

My bead shop will not be featured on Heartsy.  There was some confusion regarding the types of items to be showcased on their site and they decided that they will not feature supply shops.  Hopefully they'll like my jewelry so I can still get a spot...

Saturday, May 7, 2011

Bead Therapy to Be Featured on Heartsy!

I just received word that my Bead Therapy store on etsy (http://www.artsiebeads.etsy.com/) will be featured in an upcoming sale on http://www.heartsy.me/! If you haven't checked that site out, I encourage you to do so! Viewers vote on your store. Stores with enough votes are reviewed by the Heartsy team and those who make the cut are featured! There are only a handful of spots available per day so it's a great honor! I'm super psyched!

More info to follow!

Friday, April 1, 2011

Friday Fun!

I've been on Spring Break this week so I have enjoyed a few minutes to create some fun stuff! Curling is my winter sport so I decided to make a little earring and necklace set to donate to our local bonspeil (curling tournament). The pendant is Sterling Silver and the earrings are hand-painted shrinkable plastic. I hope you enjoy it as much as I did making it!

Friday, March 18, 2011

Store Closing Sale!

After many years and many friendly customers, I have decided to close my ebay Bead Therapy store.

For those of you who just gasped, take a deep breath in and out. Good. Now let me tell you the good news.  Both my Etsy sites as well as my main site, http://www.artsiedesigns.com/ will remain open.  Ebay has just become too expensive for me to make any sort of profit. So, I decided to move my listings to my Etsy bead shop instead.

During the transition, customers will have the opportunity to save big on all remaining inventory on my Ebay store. Please be patient with me as things might get a little tricky inventory-wise and we may encounter some out-of-stock items.

The sale begins April 1, 2011 with one full week of FREE SHIPPING for U.S. and Canadian customers! I will add specials and discounts until everything is gone or June 1, 2011, whichever comes first!

Visit Bead Therapy today to get a preview of all of my fabulous beads and findings!

Wednesday, March 16, 2011

Materials

The jewelry materials I ordered arrived today. I purchased 50 yards of chain (not that I need to use anything close to that but bulk prices help sweeten the deal) and a variety of other findings as well as some packaging. As I unwrapped the packages, I realized that there were no spools of chain in the box. I dug further and discovered that the chain was piled into plastic bags! I am certainly going to have a lovely time untangling my new materials! Maybe the untangling time will inspire me.... or annoy me ... or both... We'll see. I'll post pictures when I make something fun!

P.S. I love the packaging that I ordered. It's going to look great with my new logo!

Saturday, February 19, 2011

Check Out the Latest Treasury Featuring Artsie Designs!

Artsie Designs

Check Out the Newest Treasury Featuring Artsie Designs!


Friday, February 18, 2011

New Items

This week's batch of new items now available in my store! Check out the Swarovski crystal earrings! Can we say W-O-W?!!

www.artsiedesigns.etsy.com

Saturday, February 12, 2011

Saturday Night Poll

I'd like your help in deciding what to make next. Each week, I'll be sharing a handful of my designs and would like you to vote on your favorite! On February 19th, I'll take a name at random from those who participated in the survey. That person will win $10 worth of merchandise or merchandise discounts in my store! One vote per person, please! And thanks for your help!

A Little "Peace" of Wisdom

A few years ago, I stumbled upon a quote by Mildred Norman a.k.a. Peace Pilgrim. Peace Pilgrim was a pacifist and peace activist who walked across the United States for 28 years in support of a more peaceful existence.

In the ongoing quest for organization and motivation in my life, I am motivated by the following quote,
Live in the present. Do the things that need to be done. Do all the good you can each day. The future will unfold. - Peace Pilgrim
 So, my goal this week is to stay focused on the here-and-now, get caught up on the things that really need to be done and do something extra each day to make someone smile.

Saturday, February 5, 2011

A Picture Speaks...

Why is it so difficult to take a good photograph of my jewelry or beads? I've read tips about how to do it ... the correct light source, camera type, angle of shot, etc. I have a tri-pod ... has anyone else noticed how expensive those are? I bought a mid-range one at an electronics store and now I wish it could extend longer and that it had a level on it.  But I digress... Anyway, have the tripod, have the camera (not the most fabulous but it will do), have the props but I just can't get the light right!

The best luck I've had has been to take pictures outside. But, with 3 feet of snow (literally) on the ground and below-zero temperatures, that doesn't work this time of year. Well, I guess it could, but I'm not willing to climb through snowbanks to get the perfect shot. I know, complain, complain, complain; but what's a perfectionist to do?

One of my favorite books is "Throw Out 50 Things - Clear the Clutter, Find Your Life", by Gail Blanke. She says that, if something doesn't give you energy or make you feel good, get rid of it. That includes expectations. So I say to myself, "The pictures aren't important. Don't waste time worrying about it. They may never be as perfect as you want them to be so let go of the need for them to be perfect."

That's my mantra for the week ...

Some things aren't that important. Don't waste time worrying about it. Let it go. You'll be happier and you'll have more energy to tend to the things that are important.

Here's the link to Gail's page ... Throw Out 50 Things. Check it out.

In the meantime, what expectations can you let go of? Do you have a project that has been frustrating you? What will it cost to let it go? What will you gain by doing so?

I'm going to go put my camera away. It's a beautiful day, and I don't want to waste it worrying.

Wednesday, February 2, 2011

The Sign

I know, not the best picture. But it felt therapeutic to make it. Now to follow it ... that's the difficult part! Especially when you have so many fun things to look through!!!

Sunday, January 30, 2011

Cleaning Out the Clutter

I don't know what it is about this winter but it seems to be interfering with my ability to organize. I've got tons of beads and findings and have dozens of projects started but I don't seem to be able to finish anything!

I moved into my new home a year ago. I have plenty of room and plenty of boxes, organizers, and shelves but everything tends to get put into piles on my craft room floor. What's worse, is that everytime I sit down to organize, I find half-finished projects and start to re-work them!

Last night, I found some wood signs that I started painting last summer. Even though I'll probably never use them and likely won't be able to sell them, I sat and painted until early this morning. I'm trying to think of this in a positive light... maybe painting the signs will give me inspiration to finish other projects.  Maybe I should paint one more sign and put the rest away.  I once saw a plaque that said "Begin, the Rest is Easy." I think my sign will say, 

PUT IT AWAY, GIVE IT AWAY OR THROW IT AWAY

Then, I'll hang it so I can see it and put everything else away, including my frustration of not finishing what I started. And then I'll take a deep breath and find a new project to start.