skip to main |
skip to sidebar
Here's a little video I made showing how I interpreted mixed media artist, Daisy Yellow's, index card a day prompt, "Green."
I've decided to document my experience as a newbie to the mixed media arts. I will be posting videos and pictures in the coming months and hope that you will follow along as I learn! Please subscribe to my YouTube Channel and click the "thumbs up" button on my videos so that I know that someone is enjoying what I'm sharing. Please also leave comments/questions/critiques for me! I love feedback! Happy crafting!
Hello again! It has been awhile! Lots of news in the past year or two... got married, had the most adorable baby in the world, moved to a house we had been remodeling, am trying to sell my old house and finished
the final requirements for my therapy license! On the Life Stressors Rating Scale, I'd be scoring at the top!
I'm still not ready to fire up my Etsy shops yet, so you won't see anything in the shop links on this blog, but check out my gallery of sold items here.
Today, I thought I'd take some time to share some of my favorites. Today, my newest board on Pinterest ... Children's Mental Health Helpers. Check it out and let me know your favorites!
It is with a heavy heart that I report that I am closing my Bead Therapy (aka Artsie Beads) bead shop on Etsy. I will continue to offer unique supplies at Artsie Supplies on Etsy and, of course, you may always visit my Artsie Designs jewelry shop.
Discounts are currently at 30% off. I plan on getting together some larger lots of beads and bead supplies to list soon. Please take a look!
**Plan on completing this activity over several days or sessions to allow for dry time for the paper mache and paint. Give about an hour for the first and last sessions and ten to fifteen minutes for each session in between (when applying layers).**
Materials Needed:
Protect your work surface (plastic garbage bags work well, though newspapers will do fine) and prepare the mask by wrapping plastic wrap around and securing it in the back
Beginning at the top of the mask form, add the pasted paper strips in a horizontal pattern, overlapping slightly the strip next to it. Make sure that you've got the entire form covered. A tip - when you are finished applying the layers, take a piece of newspaper and gently wipe the excess paste off the mask, this also helps the mask to dry faster and makes the mask less bumpy to paint.
Mix a new batch of paper mache paste (or remove the paste you have made from the refrigerator). Using the same dipping technique as the last session (dip the strip in the paste and pull down with your fingers on either side of the strip), apply newspaper strips vertically over the dried strips. Allow to dry.
Welcome to my artsie blog! I hope you enjoy my random musings about crafts, paper, mental health and life in general!
Monday, August 4, 2014
Mixed Media Art Tutorial - Index Card a Day (ICAD) "Green"
Here's a little video I made showing how I interpreted mixed media artist, Daisy Yellow's, index card a day prompt, "Green."
I've decided to document my experience as a newbie to the mixed media arts. I will be posting videos and pictures in the coming months and hope that you will follow along as I learn! Please subscribe to my YouTube Channel and click the "thumbs up" button on my videos so that I know that someone is enjoying what I'm sharing. Please also leave comments/questions/critiques for me! I love feedback! Happy crafting!
Labels:
art,
art journal,
artsiedesigns,
beginning,
crafting,
daisyyellow,
diy,
green,
how to,
icad,
index card a day,
instructions,
mixed media,
mixed media techniques,
scrapbooking,
tutorial,
video,
youtube
Sunday, July 27, 2014
Improvements
In my last post, I talked about how discovering mixed media art, in particular art journals, had "saved me" from feeling stifled and just plain, "not me." I gave you a peek at some of my early mixed media attempts as well. I was feeling like my attempts were looking very amateurish so I searched YouTube for tutorials and inspiration.
Here are some of my favorites so far:
The Frugal Crafter - Lindsay is the epitome of artsiness! She offers scrapbook, mixed media, watercolor, drawing and tools and technique tutorials and posts almost daily. Plus, she's a bubbly free-spirit who is just plain fun to watch!
Jennibellie - A self-taught mixed media journalist, Jenni not only demonstrates techniques but also gives inspiring talks about creativity and building self-confidence. Plus, her English accent is fun to listen to. I'm also following her free art journaling class, Inspiration Station. You should definitely check that out as well.
Sea Lemon - A graphic designer by training, "Sea" has lots of tutorials on all sorts of crafty projects. She has some great lessons on book binding. I've already bound some of my projects and will post them soon!
Mixed Media Jen - I like Jen's videos because there's usually no talking... she has fun music playing in the background and shows you what she's using. Plus, it's in fast-forward, so you get the end result in ten minutes or less, usually.
I'm a visual learner, so the YouTube videos have been so awesome! Just search, "mixed media tutorials," or "mixed media", or "icad," or similar. By the way, "icad" is Index Card a Day. You can find out more here. These are so freeing. I'll post some of mine soon!
That's all for now! Thanks for reading and Happy Creating!
Here are some of my favorites so far:
The Frugal Crafter - Lindsay is the epitome of artsiness! She offers scrapbook, mixed media, watercolor, drawing and tools and technique tutorials and posts almost daily. Plus, she's a bubbly free-spirit who is just plain fun to watch!
Jennibellie - A self-taught mixed media journalist, Jenni not only demonstrates techniques but also gives inspiring talks about creativity and building self-confidence. Plus, her English accent is fun to listen to. I'm also following her free art journaling class, Inspiration Station. You should definitely check that out as well.
Sea Lemon - A graphic designer by training, "Sea" has lots of tutorials on all sorts of crafty projects. She has some great lessons on book binding. I've already bound some of my projects and will post them soon!
Mixed Media Jen - I like Jen's videos because there's usually no talking... she has fun music playing in the background and shows you what she's using. Plus, it's in fast-forward, so you get the end result in ten minutes or less, usually.
I'm a visual learner, so the YouTube videos have been so awesome! Just search, "mixed media tutorials," or "mixed media", or "icad," or similar. By the way, "icad" is Index Card a Day. You can find out more here. These are so freeing. I'll post some of mine soon!
That's all for now! Thanks for reading and Happy Creating!
Mixed Media: The Perfect Art for a Creative in Withdrawal
After closing my eBay and Etsy stores, I found myself feeling out-of-sorts. Something was missing in my life... I was enjoying my marriage and new baby, but I didn't feel myself. While browsing the internet, I stumbled upon The Documented Life Project, an art journal group offering weekly prompts to help you "document" your life through art. It's a really cool project! Here are a few pictures of the pages I made following the weekly prompts:
This was a really "tame" attempt... all stamping and paper scraps. I do like how it turned out, though...
I collaged a cake mix box from a cake I made for a co-worker's retirement party. It was also my birthday, so I made a little "Happy Birthday" scene on the other page (I can't find a picture of that right now).
I used some name-brand 3-D items I had purchased (I don't recall the brand though, sorry) for the cage and the red bird but I drew the other bird and cut the word, "Chirp" out of decorative paper free-hand.
There is a light coat of white gesso on top.
I followed along for a few months, but I found myself creating/experimenting in-between the weekly prompts. So, I decided to attempt to make an art journal on my own, no prompts, just whatever came to mind.
I went to the second-hand store and found an old sewing book from the 1970s. I used a pen knife and cut out every other page or so (and kept these for the awesome vintage pictures and fonts) to make the book more manageable and to create room for the dimensional objects I was planning on incorporating as I built my art journal. Note: If you want to create an art journal out of an old book, you'll have to use one that is bound, not glued. When you start cutting pages out of a glued book, your journal won't hold up and you'll likely lose pages you don't want to lose!
Here are my first attempts...
I don't like how the yellow and purple look on this page. The whole thing looks amateurish to me. Of course, it was my first attempt, so I should be nicer to myself...
My next attempt... I like how the sewing book's original pages show through. I didn't really have any "mixed media" tools at this point so I used scrapbook paper, acrylic paint and mixed acrylic paint and water to make the green spray. The radiating circle stencil is actually one of those plastic picnic plate holders from the dollar store!
I don't have a good picture of this two-page put together. I really like how it turned out. I used gesso, scrapbook paper and paper cut-outs of birds. I used watercolor pencils to draw the branches and leaves. The lattice work was accomplished by using a stencil and a compound made for creating a "snow" look for dioramas. I think I used some teal acrylic paint, too.
My sewing book journal really got me excited! I've been a busy girl and will post more pictures soon! Hope you enjoyed a peek at my beginner's attempts at an art journal!
![]() |
| Week 8: Add a flap to your flap |
This was a really "tame" attempt... all stamping and paper scraps. I do like how it turned out, though...
![]() |
| Week 9: Collage something you recycled |
![]() |
| A little friend! |
I collaged a cake mix box from a cake I made for a co-worker's retirement party. It was also my birthday, so I made a little "Happy Birthday" scene on the other page (I can't find a picture of that right now).
![]() |
| Detail Week 9 |
![]() |
| Week 11: Draw, photograph or collage a bird onto your page |
I used some name-brand 3-D items I had purchased (I don't recall the brand though, sorry) for the cage and the red bird but I drew the other bird and cut the word, "Chirp" out of decorative paper free-hand.
There is a light coat of white gesso on top.
I followed along for a few months, but I found myself creating/experimenting in-between the weekly prompts. So, I decided to attempt to make an art journal on my own, no prompts, just whatever came to mind.
I went to the second-hand store and found an old sewing book from the 1970s. I used a pen knife and cut out every other page or so (and kept these for the awesome vintage pictures and fonts) to make the book more manageable and to create room for the dimensional objects I was planning on incorporating as I built my art journal. Note: If you want to create an art journal out of an old book, you'll have to use one that is bound, not glued. When you start cutting pages out of a glued book, your journal won't hold up and you'll likely lose pages you don't want to lose!
Here are my first attempts...
I don't like how the yellow and purple look on this page. The whole thing looks amateurish to me. Of course, it was my first attempt, so I should be nicer to myself...![]() |
My next attempt... I like how the sewing book's original pages show through. I didn't really have any "mixed media" tools at this point so I used scrapbook paper, acrylic paint and mixed acrylic paint and water to make the green spray. The radiating circle stencil is actually one of those plastic picnic plate holders from the dollar store!
![]() |
| Page left |
![]() |
| Page right |
![]() |
| Texture detail |
My sewing book journal really got me excited! I've been a busy girl and will post more pictures soon! Hope you enjoyed a peek at my beginner's attempts at an art journal!
Sunday, December 29, 2013
New Board on Pinterest
Hello again! It has been awhile! Lots of news in the past year or two... got married, had the most adorable baby in the world, moved to a house we had been remodeling, am trying to sell my old house and finished the final requirements for my therapy license! On the Life Stressors Rating Scale, I'd be scoring at the top!
I'm still not ready to fire up my Etsy shops yet, so you won't see anything in the shop links on this blog, but check out my gallery of sold items here.
Monday, July 9, 2012
Good Bye & Hello
I have mixed feelings about my bead shop closing. I'll be sad and miss it as I love beads, beading, counting beads, looking at beads, sorting beads. thinking about beads.... and I've had the bead shop for almost 15 years. On the other hand, hopefully, I'll have more time to create jewelry and to continue to delve into the paper-crafting world!
I recently listed almost thirty new items in my Artsie Designs shop on Etsy.
I've been meaning to list these pieces for quite awhile. I love the graphic/comic quality of them. A super hero meets nature kind of feel. Each is hand-painted on shrinkable plastic then baked for durability and finish.
I feel like shouting "fight the power" with this one. Maybe just a "fist bump"?
Reminds me of a circus ... or candy ... or a petri dish experiment gone awry.
And this one is just plain pretty. Love the lyrical quality of the ribbons.
I'd love to know what you think of these!
-Gretchen
***
These adorable heart earrings sold within minutes! They're on their way to a wonderful customer in Denmark.
***
Super hero, maybe, vroom vroom motorcycle mama? Definitely!
Reminds me of a circus ... or candy ... or a petri dish experiment gone awry.
And this one is just plain pretty. Love the lyrical quality of the ribbons.
I'd love to know what you think of these!
-Gretchen
Tuesday, July 3, 2012
Shop Closing!

Discounts are currently at 30% off. I plan on getting together some larger lots of beads and bead supplies to list soon. Please take a look!
Tuesday, August 23, 2011
"What Lies Beneath" Feelings Mask Activity
When looking for activities to teach children about their feelings, how to identify and express them, I have struggled to find something that is not only meaningful but fun as well! Here is an exercise I have pieced together from experience and imagination that may be helpful. The children who participated in the sample were in fifth grade, though I'd guess that those as young as second or third grade, depending on the ability to understand or at least identify more complex emotions (and the mess factor involved in the activity itself), might be appropriate as well. Older children, teens and adults would likely enjoy this exercise - I'd like to see an adolescent or adult anger management group try this one.
The premise for this activity is that when we appear angry or say we are angry, most often there are many different feelings behind that anger; loneliness, jealousy, frustration, and sadness, for example. The mask is a metaphor for this. The outside of the mask represents what we show to others, the inside shows what may be underlying what is shown to others, what is "behind the mask". To prepare for this activity, I had students draw a picture of what their anger looks like (the outside of the mask) and had students list at least 5 feelings that they have that might underlie their anger (use more or less depending on the target group) on the reverse side of the paper. This makes things go more quickly once the painting begins as well.
**Plan on completing this activity over several days or sessions to allow for dry time for the paper mache and paint. Give about an hour for the first and last sessions and ten to fifteen minutes for each session in between (when applying layers).**
Materials Needed:
- Plastic Masks - Full Face - One for each participant. These are available at any craft store. You could forgo the paper mache and just use the plastic masks, but that wouldn't be as much fun!
- Plastic Wrap - to protect the plastic masks so you can use them again
- Newspaper - Ripped into thin strips plus some to use to protect the surface you're working on
- Copier Paper - Ripped into thin strips
- Flour
- Water
- Ice Cream Bucket (or other large container)
- Acrylic or Poster Paints
- Paint Pens (optional but they are super handy when writing the words inside the mask and for detailing on the outside of the mask
Day/Session 1
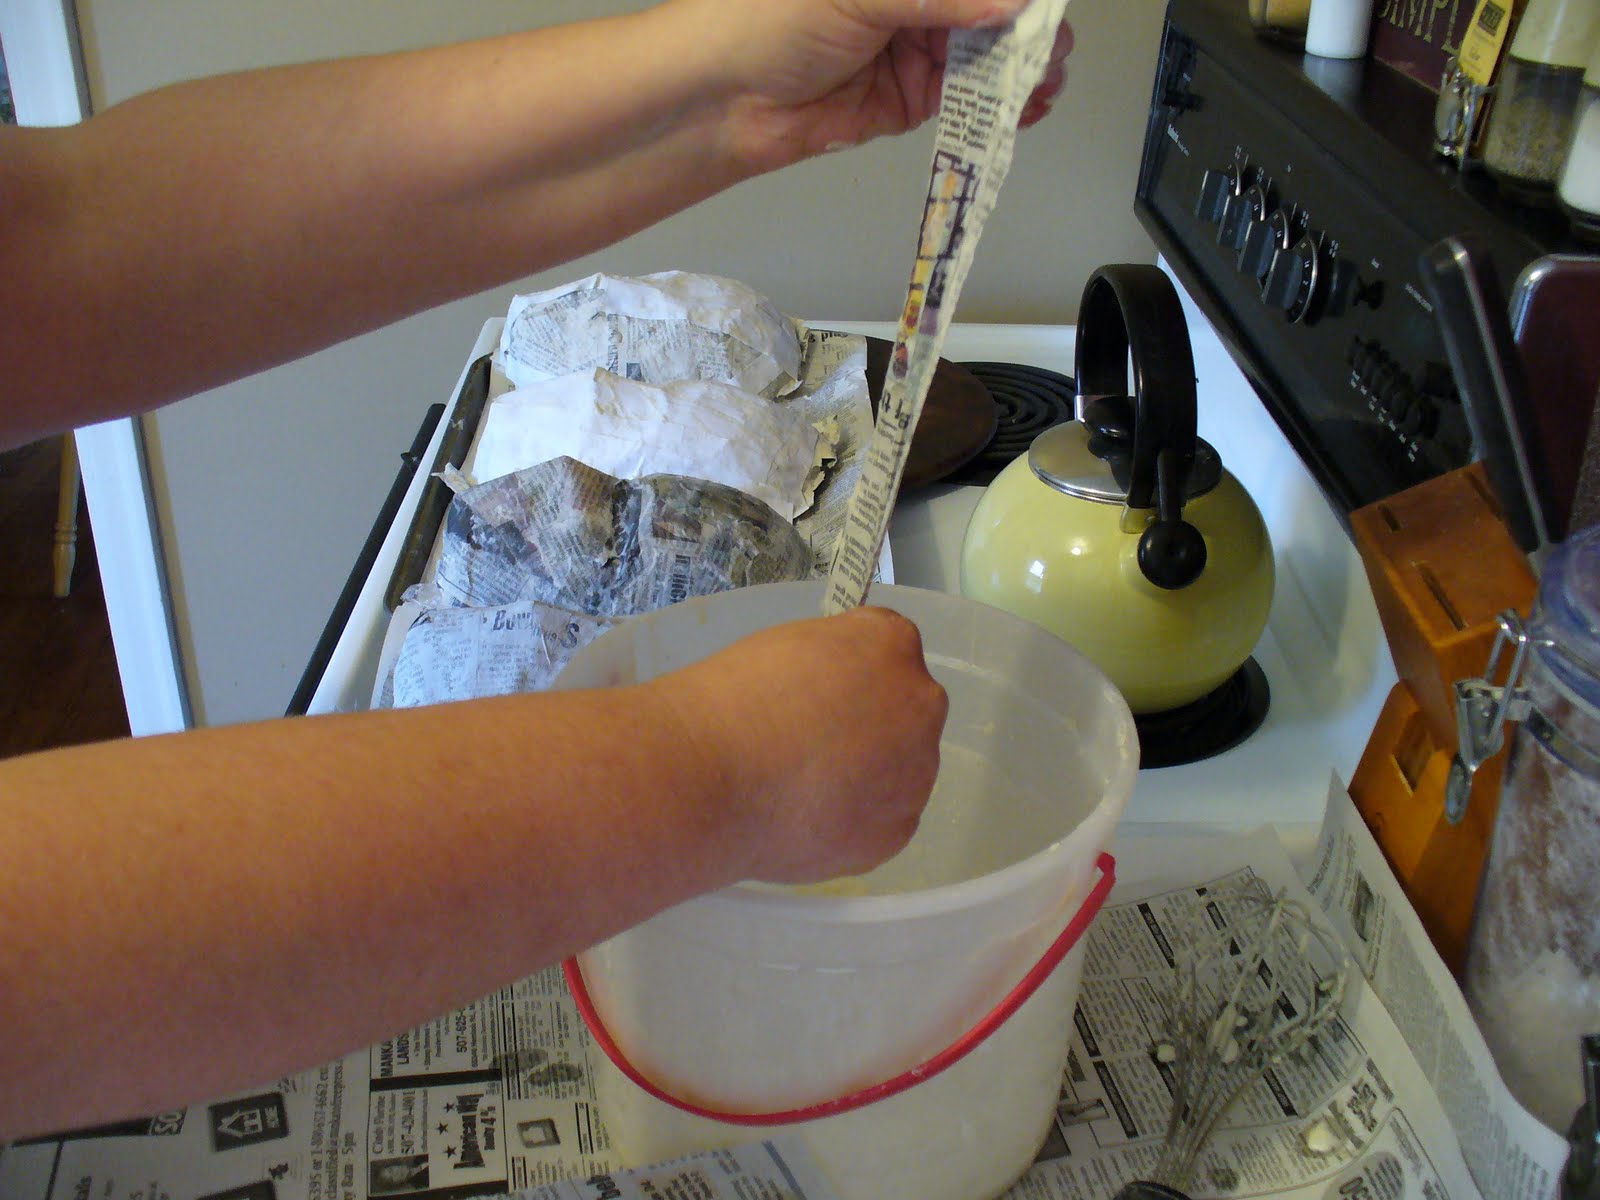
Prepare the paper mache mix. (I used the "Raw Flour and Water Paste" recipe from the Ultimate Paper Mache website). Basically, you put some flour in the bucket and then add a little water at a time and mix until you get the consistency that you'd like. The site says that the consistency is up to you. We made ours similar to the consistency of pancake batter (maybe a little runnier). I found that using a whisk helped to keep the lumps down and seemed to make it blend quicker than when I tried mixing it with a spoon.
If you haven't already done so, rip newspaper into strips about 1.5" wide or less (the photograph shows some strips wider than that but the masks took longer to dry).
Dip part of the strip into the paper mache "batter" and use your fingers to pull the paste down the length of the strip (getting rid of extra paste). I found that dipping part of the strip worked better as dipping the entire strip ended up leaving a lot of paste on the paper and that isn't wanted (the less paste, the less time it takes to dry).
Let that layer dry. You have a few options here. You could let the mask dry overnight. You could point a fan at it, rotating it every 20 minutes or so, until dry. Or, you could dry the masks in the oven using the very lowest setting. Make sure not to forget about them! It's very important that each layer of paper mache is dried thoroughly before adding the next layer otherwise the masks will rot and they would be spoiled.
If you're going to be working on the masks again that day, you can put the paste in the refrigerator in between. Take it out and give it a chance to warm to room temperature before using again. I found, while experimenting with this activity, that the flour paste goes bad in a few hours (stinky!) so I'd do the refrigerator thing or mix new batter when you start working on the masks again.
Day Two/Session Two
Day Three/Session Three
Repeat the application, this time horizontally again. Allow to dry.
Day Four/Session Four
Apply
strips of pasted copier paper vertically over the last layer. This is the base on which the participants will paint their faces.
Have each participant paint the outside of their mask to show what they look like when they are angry. When that dries, have them paint the inside of the mask a solid color. You could skip this step and just have them write/paint their feelings words directly on the newspaper but I think people will be more pleased with how things turn out if the inside is painted first.
Have each participant write feelings that might underlie their anger on the inside of the mask using paint or a paint pen. Share and discuss. You may ask the participant to tell why they painted the outside of their mask the way they did (in the photos shown here, one student painted their mask with tears because they felt that best described what they looked like when they were angry, another painted steam coming out of his nostrils), what feelings words were underlying the anger, to give specific examples of when they feel those feelings, etc.
You can vary the activity based on the age or ability level of the group, the topic or emotion of focus. Instead of focusing on feelings underlying anger, the inside of the mask could give situations contributing to feelings of anger. This could be an activity for a grief group with the front of the mask showing how they feel when they think of the person they lost and the inside of the mask showing what they'll miss about them or special memories. The possibilities are virtually endless.
Labels:
activities,
adults,
anger,
anger management,
children,
emotions,
feelings,
feelings mask,
group,
instructions,
lesson plan,
masks,
paper mache,
social skills,
supplies,
teens,
therapy group
Blog Archive
SOME OF MY FAVORITE PEOPLE
Labels
activities
altered book
anger
anger management
art
art journal
artsie designs
beading
beginning mixed media
children
children's mental health
crafting
curling
emotions
etsy
facebook
feelings
feelings mask
graphic design
hand-made
inspiration
instructions
jewelry
lesson plan
marketing
mixed media
mixed media techniques
motivation
organization
out of business
packaging
paisley
paper mache
peace pilgrim
pinterest
poetry
procrastination
quote
recycled art
scrapbooking
shrinkable plastic
shrinky dink
small business
social skills
stress
super heros
therapy group
therapy resources
Powered by Blogger.